Building a Historical Imagery Project
To build a historical imagery project:
Follow the steps in Defining and Building Resources to define and build the following:
Resources¶ Name (Resources/Imagery/…) Acquisition Date Provider Mask Source File BlueMarble Any date. The date of the base image does not affect historical imagery browsing. NASA Imagery No Mask bluemarble_4km.tif SFBayAreaLanSat_20021010 2002-10-10 USGS Imagery Auto Mask Tolerance: 2 Default for all other mask values. usgsLanSat.tif i3_15Meter_20041010 2004-10-10 i3 Auto Mask Default values. i3SF15-meter.tif SFHighResInset_20061010 2006-10-10 USGS Imagery Auto Mask Default values. usgsSFHiRes.tif Open a new Imagery Project and add each of the image resources to the project:
- Resources/Imagery/BlueMarble
- Resources/Imagery/SFBayAreaLanSat_20021010
- Resources/Imagery/i3_15Meter_20041010
- Resources/Imagery/SFHighResInset_20061010
Select the Support Historical Imagery checkbox.
Select File > Save.
Enter Projects/Imagery/SFBayAreaHistorical as the name of your project and click Save.
Build the SFBayAreaHistorical project.
Create a new Earth Database and add the SFBayAreaHistorical project.
Save the new database as Databases/SFBayAreaHistorical.
Build and push the database to GEE Server, then publish it on GEE Server to the default Publish point.
Launch Google Earth EC.
Enter or select the host name or IP address of your server in the Server field, and specify the Publish point that you selected when you published your map database.
For example, if you specify SFBayAreaHistorical-v001, it will be accessible from myserver.mydomainname.com/SFBayAreaHistorical-v001.
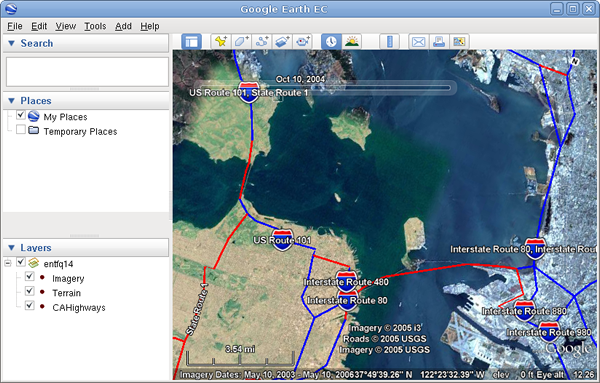
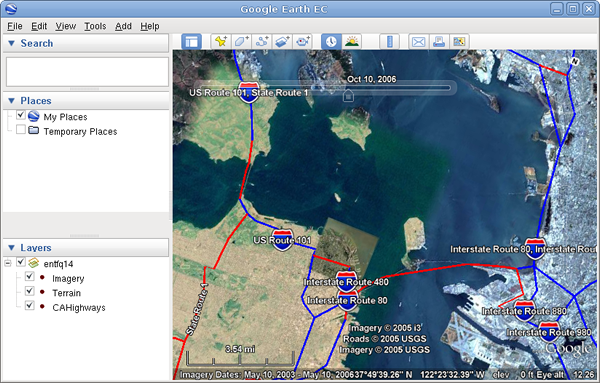
Zoom in to the San Francisco Bay Area.
Select the Historical Imagery toolbar button
 to display a time slider. The time
slider allows you to move the view through time.
to display a time slider. The time
slider allows you to move the view through time.